
XTribe Documentation
Welcome to the online documentation for XTribe server. This documentation is intended for experiment developers only.
In order to understand these pages you must know HTML and JavaScript and at least a server side development technology. We'll show examples in PHP, NodeJS, Java Server Pages, and Python.
- The Platform In Depth
- XTribe tutorial: your first game
- XTribe tutorial: options
- Appendix
The Platform In Depth
XTribe has been designed with a modular structure through which most of the complexity associated to running an experiment is hidden into a Main Server, while the experimentalist is left with the only duty of devising a suitable interface for the actual experiment. In this way most of the coding difficulties related to the realization of a dynamic web application are already taken care by the ET Server and the realization of an experiment should be as easy as constructing a webpage with the main utilities for it.
Interface and Game Manager
A game, an experiment can be imagined as a combination of two intercommunicating parts: the interface and the Game Manager (GM). The interface is what is visible to players, and will interact with them. The GM is represented by those functional parts that process the action of the players.
But even if the researcher writes down the code for both the interface and the GM, he is still far from the creation of a web game. Here, XTribe comes in handy. In the first place, the platform will host the game interface. The platform will offer a page for the description of the game rules, compiled by the researcher, from which players can access and play the game. Instead, the GM part of the game will be hosted by the researcher. In this way he can directly collect the data in real time.
Users and Data
Since the game has been created for research purposes, the researcher is interested in all sort of statistics related to players. Beside this, he may also be interested in filtering players for specific purposes, e.g. according to their age, gender, geographical location, nationality, etc. To this end, XTribe handles a user registry in which players will be allowed to register, if required, and play while the system would maintain all the information about them, such as scores, ranks, etc. together with biographical information. If needed, this information should be send to the GM, i.e. to the experimentalist.
Furthermore, based on this information, when properly configured, the system will grant the access to the game only to certain profiles. Being in charge of the handling of the user registry, the system would also spare the researcher from dealing with privacy and security issues since all data will be properly anonymized and, possibly, encrypted. However, by default, it is still possible for unregistered users to access the games. Filters are applied only if set by the researcher.
... and this is how it begins!
Once the players have accessed the game, the system will create an instance of the game. There may be given rules for the game to start. A basic rule is the number of players: a certain number of players have to be reached to start a game. There may be also different constraints such as locations, age, sex, etc. As soon as there is a sufficient number of players satisfying the grouping constraints, the game starts.
The Game
The interface will transmit the actions of the players to the GM, but all messages will pass through the system, which will group them by match instance number after having anonymized them. The GM will then receive the data, will elaborate them and will send the results of the elaboration back to the system, which in turn will transmit them to the interfaces. Obviously, it will also save the data of interest locally (the GM runs on the researcher’s machine). The platform will also handle errors and exceptions. For instance, if the match aborts because one of the players disconnected, the system will detect it, will notify the abort to the remaining players and will send a message to the GM. Since there is no direct communication between GM and interface, the GM will experience no trouble at all. All these features, especially the user registry and the instance handling, usually require a lot of coding, quantified in time and money, to be realized. Within XTribe, they can be realized with a straightforward procedure. After the configuration, the system will automatically take care of all. What researchers have to do is writing the code of the interface and of the GM.
Yes, but how?
The interface has to be structured as a web page with plenty of freedom in using HTML, CSS, Flash, etc., while the interaction between the interface and the system has to be achieved by means of the ET API, which are internally developed as Javascript functions. With this simple set of functions the interface will interact with the platform and, through it, with the GM. Basically, the GM has to work as a HTTP server hosted on the researcher’s machine. The communication with the system takes place through the HTTP protocol and all messages are coded in JSON format. Besides a restricted set of system messages, the game internal protocol is fully elaborated by the researcher. The following parts contains some tutorials aimed at introducing the various concept related with the XTribe platform. If you haven't done yet, go on XTribe and play some of the game available there.
XTribe tutorial: your first game
- how to write a simple User Interface for the game;
- how to send and receive messages client side;
- how to write a server side manager that simply broadcast messages in PHP, NodeJS, Python and Java (JSP);
- how to set up an experiment on XTribe server (on lab.xtribe.eu).
User interface
<!DOCTYPE html>
<html>

    <head><title>XTribe - First game</title></head>
    <body>
        <h3>XTribe first game</h3>
        <p>It is just a simple chat.</p>
        <form onsubmit="return sendText()">
            <label for="myText">Text to send:</label>
            <input type="text" id="myText">
            <input type="submit" value="Send">
        </form>
        <p>Received text: <b id="recText">empty</b></p>
    </body>
</html>
We'll now see how to send and receive messages with the JavaScript API provided by XTribe server. First of all we have to include the js. Since your html page will be hosted on XTribe server you don't have to download the API js file. You can simply include it this way:
<script src="/js/ETS/api/1.0/Client.js"></script>
- destination: can be either 'system' or 'manager';
- topic: this is a custom string for messages sent to the manager, while for system messages there exists a list of well known system topics;
- params (optional): data to be sent with the message, can be a single value of any basic type, an array or an object.
We'll now use this knowledge to write the sendText() function used in the onsubmit event of our form.
<script type="text/javascript">
var myETSclient = new ETS.Client();
function sendText() {
    var textField = document.getElementById('myText');
    var text = textField.value;
    myETSclient.send('manager', 'chat', text);
    textField.value = '';
    textField.focus();
    return false;
}
</script>- source: can be either 'system' or 'manager';
- callback: this is the function to be called when a message is received. The message will be passed to the callback function.
myETSclient.receive('manager', receiveText);
function receiveText(msg) {
    console.log(msg);
    if (msg.topic == 'chat') {
        var text = msg.params;
        var recTextField = document.getElementById('recText');
        recTextField.innerHTML = text;
    }
}
<head>
    <title>XTribe - First game</title>
    <script src="/js/ETS/api/1.0/Client.js"></script>
<script type="text/javascript">
var myETSclient = new ETS.Client();
myETSclient.receive('manager', receiveText);
function sendText() {
    var textField = document.getElementById('myText');
    var text = textField.value;
    console.log('Sending '+text+' to the manager');
    if (myETSclient) myETSclient.send('manager', 'chat', text);
    textField.value = '';
    textField.focus();
    return false;
}
function receiveText(msg) {
    console.log(msg);
    if (msg.topic == 'chat') {
        var text = msg.params;
        var recTextField = document.getElementById('recText');
        recTextField.innerHTML = text;
    }
}
</script>
</head>Manager
- the Quick Start guide to install easily a node.js manager providing basic functionality
or
Quick Start
You can follow these steps to install locally a node.js manager for your own Xtribe game. This is the starting point for developing your own manager, and the library, here included, provide a set of useful tools to enhance creating experiments experience.
- Make sure to have a recent version of node.js installed.
- Download the Xtribe Games Manager Framework from our Github project.
- Unzip the file.
- Open a command-line terminal and change directory to the ‘master’ directory you just unzipped or copy files in a directory of your choice and change to it.
- Run this command 'npm install && cd node_modules/etsman/ && npm install && cd ../..' to install required libraries. This will create a ‘node_modules’ directory, containing Xtribe Manager Library (etsman) and the libraries it depends on.
- Run nodejs index.js to run your manager.
- Visit http://localhost:9000/monitor on your browser to check if it is running. Please notice that Xtribe needs to reach your manager so start it on a server that is someway reachable, that is having an url address or a fixed ip (e.g.:http://yourServerAddressOrIp:9000/). This is the Manager URI to provide to Xtribe while publishing the game.
- Modify index.js for customizations.
- Check out examples directory and take a look to code examples to get started about building your own manager.
If you have problems during installation, please refer to Quickstart: Troubleshooting section. Please refer to Manager API section for details about tools made available by Xtribe Manager Library. Xtribe Games Manager Framework is available on our Github project.
In alternative, if you don't want to use the quickstart procedure, you can use the following instructions to code your manager from scratch and, in any moment, include our API in your own project.
Code your manager from scratch
PHP implementation
<?php
header('Content-type: application/json');
if ($_POST['message']) {
    $message = json_decode($_POST['message']);
    if ($message->{'sender'} == 'system')
        manageSystemMessage($message);
    else
        manageClientMessage($message);
}
function manageSystemMessage($message) {
    // nothing to do here
}
function manageClientMessage($message) {
    if ($message->{'topic'} == 'chat') {
        $text = date(DATE_RSS) . $message->{'params'};
        $outMessage = array(
            'recipient'     =>   'client',
            'instanceId'    =>   $message->{'instanceId'},
            'clientId'      =>   $message->{'clientId'},
            'broadcast'     =>   true,
            'includeSelf'   =>   false,
            'topic'         =>   'chat',
            'params'        =>   $text
        );
        print(json_encode($outMessage));
    }
}?>- we prepare a new string variable concatenating the current time (in a human readable format) with the string wrote by the player (received as message parameter);
- we create a message (i.e., an associate array in PHP) to be broadcasted to clients participating to the current instance 1 of the game. It is mandatory to specify a clientId for each message that designate the receiver, but in case of broadcast messages that client can be excluded from the broadcast (by means of includeSelf attribute). The message topic is 'chat' (as clients expects) and the params hold the new string;
- we finally print out the message (in the http response body) encoded in JSON.
http://yourserver.group.institution.edu/path/manager.php
http://man.xtribe.eu/tutorial/manager.php
NodeJS implementation
var express = require('express'),
        app = express();
var bodyParser  = require('body-parser');

app.use(bodyParser.urlencoded({extended: true}));
app.use(bodyParser.json());

app.post('/', function(request, response) {
    var message = JSON.parse(request.body.message);
    if (message)
        if (message.sender == 'system')
            manageSystemMessage(response, message);
        else
            manageExperimentMessage(response, message)
    response.end();
});
app.listen(1234);
function manageSystemMessage(response, message) {
    // nothing to do here
}
function manageExperimentMessage(response, message) {
    if (message.topic == 'chat') {
        var text = (new Date())+message.params;
        var outMessage = {
            recipient:      'client',
            broadcast:      true,
            instanceId:     message.instanceId,
            clientId:       message.clientId,
            includeSelf:    false,
            topic:          'chat',
            params:         text
        };
        response.json(outMessage);
    }
}http://yourserver.group.institution.edu:1234/
Python implementation
from datetime import datetime
import json
from flask import Flask, request, jsonify
app = Flask(__name__)
@app.route('/', methods=['GET', 'POST'])
def hello():
    if ('message' in request.values):
        message = json.loads(request.values.get('message'))
        if (message['sender'] == 'system'):
            return manageSystemMessage(message)
        else:
            return manageClientMessage(message)
    else:
        return 'no message'
def manageSystemMessage(message):
    return '' # nothing to do here
def manageClientMessage(message):
    text = datetime.now().isoformat(' ') +' '+ message['params']
    return jsonify( recipient   = 'client',
                    broadcast   = True,
                    includeSelf = False,
                    instanceId  = message['instanceId'],
                    clientId    = message['clientId'],
                    topic       = 'chat',
                    params      = text )
if __name__ == "__main__":
app.run(host='0.0.0.0', port=1234)http://yourserver.group.institution.edu:1234/
JSP implementation
<%@page import="java.util.Date,org.json.simple.*"%><%
response.setContentType("application/json");
if (request.getParameter("message") != null) {
    String data = request.getParameter("message");
    JSONObject message = (JSONObject)JSONValue.parse(data);
    if (message.get("sender").equals("system")) {
        // manageSystemMessage
        // nothing to do here
    } else {
        // manageClientMessage
        if (message.get("topic").equals("chat")) {
            String text = new Date() +" "+ message.get("params");
            JSONObject outMessage = new JSONObject();
            outMessage.put("recipient", "client");
            outMessage.put("broadcast", new Boolean(true));
            outMessage.put("instanceId", message.get("instanceId"));
            outMessage.put("clientId", message.get("clientId"));
            outMessage.put("includeSelf", new Boolean(false));
            outMessage.put("topic", "chat");
            outMessage.put("params", text);
            out.println(outMessage);
        }
    }
}%>http://yourserver.group.institution.edu:8080/path/manager.jsp
Other languages
- be reachable on a public http url (server, port and or path of your choice);
- be able to receive a POST variable named message (the same way a string is received from an html form);
- be able to encode and decode strings in JSON format (JSON libraries are available for almost all languages);
- return a JSON string as body of response (set the Content-type header line to application/json is a good practice).
Include Manager API in your project
If you have developed a manager in node.js and you want to use our Xtribe Manager API, install it is very easy.
In your manager directory run
npm install etsman
and do not forget to include it in your main js file
var etsman = require('etsman');Please refer to Manager API section for details about tools made available by Xtribe Manager Library.
Publishing the game
http://man.xtribe.eu/tutorial/manager.php
- we implemented a simple User Interface with html and JavaScript that, relying on the ETS api, send and receives messages;
- we wrote a server side manager that broadcast messages after performing some manipulation of the received params (enrich the string with a time stamp);
- we plubished the game on the XTribe testing environment.
- log received data on file or database for scientific analisys;
- determine when the game is over and terminate it with a proper message to the ETS system;
- handle messages sent by the ETS system (especially errors and disconnections) both in the manager and in the user interface.
Multilingual experiments
On the left side of Xtribe website pages, there are flags allowing users to change language. If a user choose a specific language, only experiment available in that language will be available to him. So your experiment is published, but how to provide it in more than one language?
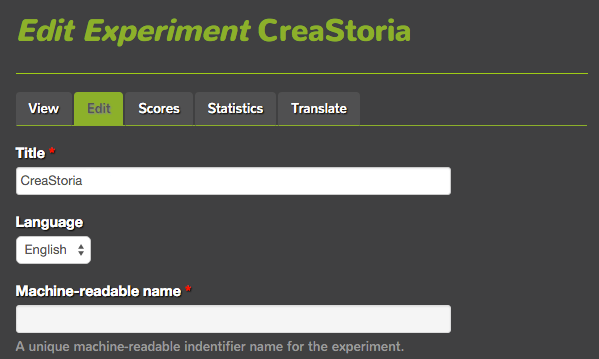
During experiment creation, use the drop-down menu ‘Languages’ to choose one language.
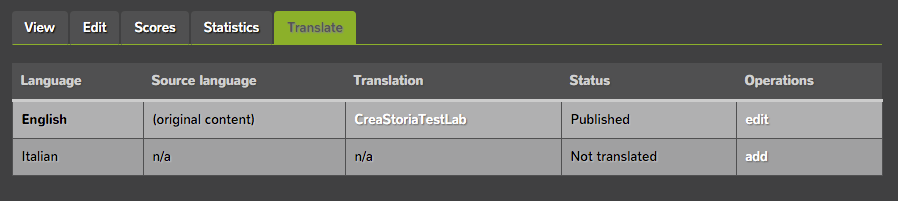
Once the experiment has been created, editing it again, you will find a tab ‘Translate’ on top of its edit page. Click on ‘Translate’ and check the actual state of translations. Clicking on ‘add’ you can provide a translation in a additional language.
In the edit page of a translation, you will see a label ‘(all languages)’ besides some fields. Xtribe does not require you to reload your client or set again your conditions, separately, for every translation. The label means that the field is the same for all languages. Presently, only ‘Title’ and ‘Body’ fields are separated, respect to translation, so to allow you to provide different presentations in different languages for the same experiment.

Active and join conditions
Xtribe experiment creation offers some options meant to help you during your game creation and developing experience.
- Join conditions: Your experiment could need some requirement from its partecipants. Maybe your sample group must be made of women or only men about 50 years. You can set up your conditions and only players fulfilling your requirements will be allowed to partecipate.
- The experiment is active and can be joined: The experiment can be disabled at any moment, checking this option.
- Anonymous users can join the experiment: Allow anonymous users to join the experiment. If no join condition is needed, this can be (or not) desirable, according to experiment specific goals.
- Show the experiment in public website list: You can decide whether or not to show your experiment in Xtribe homepage game list.
- Perform as a standalone application: The experiment will be showed fullscreen. No additional graphic will be added. Please, provide an internal way to exit from game.
- IFRAME dimensions in pixels (Width x Height): Specify the width and the height of the IFRAME where the experiments run into. Enter "fullscreen" to use fullscreen mode. Defaults to 640x280. In fullscreen mode, the experiment will be showed fullscreen, but, on the top of the page, will be added an Xtribe toolbar, allowing the user to exit from the game and return back to your Xtribe game join page. (see Over message)
Inviting people to play your game
During creation/edit of your experiment, you can select the option 'Show the experiment in public website list' to make your game available on www.xtribe.eu for everyone to join and play. Otherwise or additionally, you may need your player to start a game directly from your website, or invite them by other means like emails or social networks. In this case, you can use the 'Play link' available among game's 'Active conditions'.
Start with parameters
In certain situation, it's useful to start games with some parameters. For example:
- You have a sample of subjects, divided in subgroups, accordingly to some criteria. Your game needs to recognize if a player belongs to a certain group.
- You gave players, inside your game, the ability to 'share' on social networks to play with their friends. When someone visits the join game link shared, the game must know who challenged the incoming player.
- You want some players to start from a certain level or in a specific game mode.
You can pass parameters directly in the 'Play link' of your game, following the standards of a classic querystring. This allows you to give to different people different links to access your game and to have them start a game with any starting parameter you require.
For example, you could invite by mail two different groups of subjects by sending them two different links:
http://www.xtribe.eu/ets/exp-join/123?subgroup=1
http://www.xtribe.eu/ets/exp-join/123?subgroup=2
or you can generate, inside your game, the social link to share:
http://www.xtribe.eu/ets/exp-join/123?challenger_id=1
or you can choose the mode your player will play
http://www.xtribe.eu/ets/exp-join/123?level=hard&stage=32
You can send as many parameter as you need.
http://www.xtribe.eu/ets/exp-join/123?subgroup=1&some_other_parameter=something_useful
Retrieving parameters is simple. You can find them in the 'ready' message, under the heading 'querystring'. For further informations, check Messages in detail section of this documentation.
Grouping rules
Xtribe experiment creation offers the possibility to set some rules to control some players characteristics
-
Share languages: Assure that players, within the same game of your experiment, share one or more spoken language. You can add a condition to limite them (see Join Condition), to have your players talking at least one common language among the ones you chose. Remember to enable the setting 'user data sending' to make sure that every game will receive informations about languages in common among its own players.
- Strict Mode: When you set a join condition, it will be evaluated comparing your request to the informations the player entered in his profile, during registration. These informations are not mandatory and your player could have not filled them. In this case, the default behaviour is to let player in, in order not to limit partecipation when a requirement could not be verified. This happens even in case of anonymous players. Enabling this rule restrict partecipation to players fulfilling conditions beyond doubt. In order to acquire necessary informations from the player, he will be asked to complete his profile and fill them, through a simple auto-generated form, before joining the game. If the user is anonymous, data will be saved in a temporary location, allowing player to join games for the time being.
Advanced options
Xtribe experiment creation offers some advanced settings that you could use to enhance game or debugging experience.
- Timeout on join: Once a player decide to join the game, he begins to wait for others to join, until the number of players needed by the game is reached. This option allow you to choose maximum time he has to wait if no one else is joining, before to be warned that there is no one joining so the game cannot start.
- Permits multiple join from the same user: Game istances are supposed to accept infinite anonymous player, meanwhile registered user are accepted to enter only one time for game. This options allows a registered user to join a game how many times he wants. This is only allowed for testing purposes. Please don't forget to uncheck this option when your game will be released on his final version.
- Enable user data sending: if you check this option, along with the every ready system message from clients, your manager will receive user data. Please refer to 'ready' message documentation for details.
- Icon: choose an icon to be displayed for your game.
Sharing your game
Xtribe is platform for gaming developing as well as a community of developer. It is very useful for community members to have mutual access to raw code of games, so Xtribe provide an internal sharing system, meant to preserve games code in a public git repository.
At the moment of creation or editing of an experiment, you will find, at the bottom of the creation page, just before saving button, a section named “Share your game”. If you choose to share your game by checking the appropriate checkbox, automatically, the client you uploaded for the game will be shared. Optionally, you can choose to upload your manager, that then will be shared, as well. A few minutes after you saved your game, it will be showed in our “Shared Experiment” page, for common use. Please, add a readme file to your uploadings, in order to explain what your code is about to the developers who will consult it as learning material.
Each time you will edit (or create) an experiment, which you gave sharing permission for, a new version of the game will be shared, identified by a timestamp. Remember to update both your client and manager.
You can revoke permission to share your code at any time, by editing your experiment, unckecking the appropriate checkbox and saving it. This operation will remove from our repository all versions of your experiment and cannot be undone. So, please be careful.
By accepting to share your game, you agree that your code will be released under Agpl 3.0 license and Xtribe conditions of use.
Download shared game
If you wish to take a look to shared code you can visit:
http://xtribe.eu/ets/shared_experiments
Here you will find all the games shared by you and other developers, ordered by game name. Each version can contain game client, game manager or only one of them. You’re free to download code and use it in accordance with licenses.
XTribe tutorial: options
<body>
<h3>XTribe test game</h3>
<p>It is just a simple chat.</p>
<form onsubmit="return saveUsername()">
<label for="nameToBeSaved">Insert/Change your username:</label>
<input type="text" id="usernameToBeSaved">
<input type="submit" value="Save">
</form>
<label id="greet"></label><br><br>
<form onsubmit="return sendText()">
<label for="myText">Text to send:</label>
<input type="text" id="myText">
<input type="submit" value="Send">
</form>
<p>Received text: <b id="recText">empty</b></p>
</body>
function saveUsername() {
        var textFieldUsername = document.getElementById('usernameToBeSaved');
        var usernameToBeSaved = { username: textFieldUsername.value };
        myETSclient.optionsSave("usernameNotANamelessChat", usernameToBeSaved, function () {
            textFieldUsername.value = '';
            updateUsernameLabel();
        });
        return false;
}
var username = null;
function updateUsernameLabel() {
        myETSclient.optionsLoad("usernameNotANamelessChat", function (data) {
            username = data;
            if (username != null ){ document.getElementById('greet').innerHTML="Your actual username is "+username.username+"!"; }
            else { document.getElementById('greet').innerHTML="Your actual username is Anonymous!"; }
        });
    }
updateUsernameLabel();
function sendText() {
        var textField = document.getElementById('myText');
        var text = "";
        myETSclient.optionsLoad("usernameNotANamelessChat", function (data) {
            username = data;
            if (username != null ){
                text = " "+username.username+" wrote: "+textField.value;
            }else{
                text = " "+"Anonymous"+" wrote "+textField.value;
            }
            console.log('Sending '+text+' to the manager');
                if (myETSclient) myETSclient.send('manager', 'chat', text);
                textField.value = '';
                textField.focus();
        });
        return false;
    }
<!DOCTYPE html>
<html>
    <head>
        <title>XTribe - First game</title>
        <script src="/js/ETS/api/1.0/Client.js"></script>
    <script type="text/javascript">
    var myETSclient = new ETS.Client();
    myETSclient.receive('manager', receiveText);
var username = null;
    function updateUsernameLabel() {
     myETSclient.optionsLoad("usernameNotANamelessChat", function (data) {
username = data;
if (username != null ){ document.getElementById('greet').innerHTML="Your actual username is "+username.username+"!"; }
else { document.getElementById('greet').innerHTML="Your actual username is Anonymous!"; }
});
    }
    updateUsernameLabel();
    function saveUsername() {
   var textFieldUsername = document.getElementById('usernameToBeSaved');
     var usernameToBeSaved = { username: textFieldUsername.value };
   myETSclient.optionsSave("usernameNotANamelessChat", usernameToBeSaved, function () {
console.log("Username saved");
textFieldUsername.value = '';
updateUsernameLabel();
});
return false;
    }
    function sendText() {
var textField = document.getElementById('myText');
var text = "";
myETSclient.optionsLoad("usernameNotANamelessChat", function (data) {
username = data;
if (username != null ){
text = " "+username.username+" wrote: "+textField.value;
}else{
text = " "+"Anonymous"+" wrote "+textField.value;
}
console.log('Sending '+text+' to the manager');
if (myETSclient) myETSclient.send('manager', 'chat', text);
textField.value = '';
textField.focus();
});
        return false;
    }
    function receiveText(msg) {
        console.log(msg);
        if (msg.topic == 'chat') {
            var text = msg.params;
            var recTextField = document.getElementById('recText');
            recTextField.innerHTML = text;
        }
    }
    </script>
    </head>
    <body>
        <h3>XTribe test game</h3>
        <p>It is just a simple chat.</p>
            <form onsubmit="return saveUsername()">
                    <label for="usernameToBeSaved">Insert/Change your username:</label>
                    <input type="text" id="usernameToBeSaved">
                    <input type="submit" value="Save">
            </form>
            <label id="greet"></label><br><br>
            <form onsubmit="return sendText()">
                 <label for="myText">Text to send:</label>
                 <input type="text" id="myText">
                 <input type="submit" value="Send">
            </form>
        <p>Received text: <b id="recText">empty</b></p>
    </body>
</html>Appendix
System messages
- sender: a string that identificates the sender of the message. For system messages it is always 'system'. Other possible values are 'manager' and 'client'
- topic: a string that describe the message topic, see below for a complete list of system message topics available.
- instanceId: the unique id of the current experiment instance.
- clientId: the unique id of the client the message relates to. It is empty if not applicable
- params: arbitrary data, for system messages. Can be empty.
- recipient: a string that identificates the recipient of the message. In this case must be it always 'system'.
- topic: a string that describe the message topic, see below for a complete list of system message topics available.
- instanceId: the unique id of the current experiment instance.
- clientId: the unique id of the client the message relates to. This ID is meaningful only inside an instance to distinguish players. It is empty if not applicable.
- params: arbitrary data, for system messages. Can be empty.
Join Phase
- PING (manager): used to see if the manager is running. No response required.
- INSTANCE (manager): notify that a new instance of the experiment is being created.
- JOIN (manager): a player joined the instance.
- LEAVE (manager): a player left the instance during the join pahse (i.e., while waiting for other players to join).
- START (client): there are enough players to start, each of them can stop waiting and load the user interface html page.
- READY (manager): notify that a specific client (see clientId) has load the user interface and is ready to receive messages from the manager. Optionally it can contain user data.
Experiment termination
- OVER: either the manager or each of the clients can send an OVER message to the system to declare that the experiment is terminated, intentionally. The manager can set the score parameter in order to declare user scores at the end of the game. Clients cannot declare scores. Once the system receive this message it sends it back to all clients and the manager. If the experiment is executed in fullscreen or iframe mode, quitting by the xtribe toolbar exit button cause the client to send an 'over' to its manager, in order to communicate that the player ended intentionally the game.
- DROP (manager): notify that a new instance is been dropped before starting, because all players stop waiting.
- ABORT (manager): notify that clientId left an active instance.
- END (manager): notify that clientId left an instance that was already over.
- ERROR: some connection error occured and one the clients is no longer reachable, the instance cannot continue.
Messages in detail
READY
Ready message can arrive plain, like any other system message, or enriched of client user data. Creating (or modifying) your experiment, you can check an option, stating if user data must be sent or not.
The system spare the researcher from dealing with privacy and security issues so all data are properly anonymized and selected. You can use data to enhance gaming experience. For example, setting your interface client language automatically, or checking birth date, sex or education to present different contents. Otherwise, you can enhance data gathering by user profiling.
Remember: data are filled by players, so, if you find that some fields are empty, it means that he intentionally decided not to give that data about himself.
Here we list what data will be available inside the params field of the ready message:
- clientId: every Xtribe player is identified by a unique id. If player is not registered, this id could change during time. If player is registered, this id will be unique for every game he will partecipate. For privacy sake, clientId is determined by the system.
- created: user account data creation.
- timezone
- language: language chose for displaying contens in Xtribe.
- roles: role inside Xtribe, so you can distinguish researchers or administrators from real player.
- birth_date: date of birth, including timezone in which was calculated.
- spoken_languages
- sex
- education
- country
- isAnonymous: state if the user is anonymous or registered.
- instances_started: An approximated logarithmic misure of how many games a player started.
- perc_instances_ended: A misure of the ratio between started and ended games, expressed as a value between 0 and 1. Xtribe You can use it to know if your player is a 'good' or a casual player. The misure given are not precise, for privacy sake, but can be a good point to evaluate players quality.
- querystring: the parameters, optionally, sent along with the 'play link' of the game. Refer to Start with parameters section of this documentation.
Client API
<script src="/js/ETS/api/1.0/Client.js"></script>
var myETSclient = new ETS.Client();
send(recipient, topic, params)
send(recipient, message)
receive(callback)
receive(sender, callback)
goToHome()
goToJoin()
goToDescription()
optionsSave(name, data, callback)
optionsLoad(name, callback)
Manager API
If you developed your manager in node.js, you can use our library, which provide a set of useful tools to enhance creating experiments experience. Feel free to propose corrections, changes or to request feature that you would find useful. You can find our API on Github!
You can install it by npm.
In your manager directory run
npm install etsman
and do not forget to include it in your main js file
var etsman = require('etsman');
You can use any of these methods, exported by the library, for your own use. Remember to check out examples directory and take a look to code examples.
N.B: Your manager will be listening on the URL http://yourServerAddressOrIp:yourPort/. In the following documentation, we’ll assume ‘yourServerAddressOrIp’ equal to ‘localhost’ and port to ‘9000’, just for simplicity sake. Use your own server address and port for your manager!
startManager(options)
Launch your manager, listening to Xtribe messages. Accepts parameters by the optional object ‘options’, that can contain several custom settings. Any parameter, not explicitly set, will be resolved with default ones.
- port (default ‘9000’): your manager will be listening on this port. E.g.:http://localhost:9000
- monitor.enabled (default ‘false’): true or false to enable/disable the Debug Monitor. Debug Monitor displays all the chain of messages exchanged between Xtribe, your manager and your clients to let you understand what is going on and to debug your code. Monitor is available by default on this link: http://localhost:9000/monitor
- monitor.customLink (default ‘monitor’): you can customize the link to behttp://localhost:9000/myMonitor
- monitor.verbose (default ‘false’): true or false to enable verbose mode to log more debug informations. It will log all messages exchanged between system, manager and clients.
- debugSender.enabled (default ‘false’): true or false to enable/disable the Debug Sender. Debug Sender allows you to send messages directly to your manager to debug it. Debug Sender is available by default on this link: http://localhost:9000/debugSender.
- debugSender.customLink (default ‘monitor’): you can customize the link to behttp://localhost:9000/mySender
- onClientMessage, onPing, onInstance, onJoin, onLeave, onReady, onOver, onDrop, onAbort, onEnd, onError: handlers for the various kind of system/experiment messages. All of the handler functions must receive two parameters: the incoming message and a function to be called on completion.
GAMEDATA (global variable)
The global variable GAMEDATA contains data about your game instances, in JSON format, and gets filled in real-time from the moment the manager is started to the moment it is stopped. GAMEDATA contain these data for each instance of the game:
- instanceId: id of the current instance of the game
- experimentId: id of the current game
- created/started/ended/aborted: when the game is created,started,ended or aborted, a timestamp of that event is added in this field. Please refer to ‘System Message’ section in Xtribe documentation, for details about the occurring of these events.
- players: players data are added (or removed) during Join phase as players ‘join’ (or ‘leave’) the game. At ‘ready’ time, data are updated and enriched, if the option ‘Enable user data sending’ is enabled in your game. For each player, these data are displayed:
- clientId: identifies univocally a player,
- readyTimestamp: timestamp of the moment the player started to play
- player data: eventually delivered by Xtribe, along with the ready message, if you enabled, in your game settings, the option ‘Enable user data sending’. Please refer to ‘Messages in detail - Ready’ section in Xtribe documentation, for details about these data, and to ‘Advanced Options’ section for enabling this setting in your game.
You can access these data by the GAMEDATA variable directly, or using the method getInstanceData(instanceId).
getInstanceData(instanceId)
Returns data about the instance identified by the instanceId passed as parameter. Remember that the instanceId of a specific istance of your game is passed as part of almost any Xtribe message received and sent by your manager and client, during that instance lifetime.
logToMonitor(obj)
Logs to the Debug Monitor, directly from your manager.
prettyJson(obj)
Format an object in a readable JSON format.
userError(errorString)
Stops execution and sends back a user error
nothingFound()
Stops execution and sends back a ‘nothingfound’ error
exitIfEmpty(obj)
Stops execution and sends back a ‘nothingfound’ error if the object is empty
exitIfNull(obj)
Stops execution and sends back a ‘nothingfound’ error if the object is strictly null
errIfEmpty(obj)
Stops execution and sends back an ‘empty object’ error if the object is empty
errIfNull(obj)
Stops execution and sends back an ‘null object’ error if the object is strictly null
isEmpty(obj)
Checks if an object is empty (returns true or false)
tryWaterfall(functions, callback)
Utility function similar to async.waterfall, with exception handling. Runs the tasks array of functions in series, each passing their results to the next in the array. However, if any of the tasks pass an error to their own callback, the next function is not executed, and the main callback is immediately called with the error. (See Async) This useful library is included in etsman and exported as etsman.async, so you can use for example etsman.async.each(arr, iteratee, [callback])
intersectSafe(a, b, count_empty_as_full)
Calculate intersection between two array a and b leaving them untouched, and returns the resulting array. If count_empty_as_full is set to true, the intersection of a filled array with an empty array returns the filled.
currentTimestamp()
Return the current timestamp in Unix Time format (number of milliseconds elapsed since 1 January 1970 00:00:00 UTC). (See Unix Time)
connectToMysqlDb(host,database,user,password)
Connects to a mysql database. Accepts as parameters:
- host: The hostname of the database you are connecting to (‘localhost’ if on your machine)
- database: Name of the database to use for this connection
- user: The MySQL user to authenticate as
- password: The password of that MySQL user
External libraries exported
Our library export some useful third-party libraries, so you don’t have to include them again.
async
The useful library async (Async) which provides straight-forward, powerful functions for working with asynchronous JavaScript)
_
The library lodash (Lodash). Learn how to take the hassle out of working with arrays, numbers, objects and strings)
Using example managers with your game interface on Xtribe
Did you already create your game and user interface on Xtribe to use with manager built through tribe Manager API, didn’t you? Check out our tutorial to create your first game on our platform. Follow ‘Publishing the game’ and ‘User Interface’ paragraphs instructions. It’s easy and quick.
The example managers provided, run as standalone application as you start them:
nodejs example_name.js
Every example starts on port 9000+example number (e.g.: 9001 for example 1, 9002 for example 2), so, if you start one of them on your server, it will be running on an url like:
http://yourServerAddressOrIp:9001
Copy this url and paste it in ‘Manager URI’ field in the settings of your game. Now, play your game to see the manager in action.
Please notice that Xtribe needs to reach your manager, so start it on a server that is someway reachable, that is having an url address or a fixed ip (e.g.:http://yourServerAddressOrIp:yourPort/).
Quick Start: Troubleshooting
-
When I run my manager, this error is shown.
Error: Cannot find module 'etsman'
- You have not installed Xtribe Manager API. Run npm install in the directory where you stored downloaded files.
- You have not installed Xtribe Manager API. Run npm install in the directory where you stored downloaded files.
-
When I install libraries with npm install, my node_modules directory is nearly empty or it is not created.
- Check your permissions. If you are on Linux or Mac OS you may need to run npm install as superuser.
- Check your permissions. If you are on Linux or Mac OS you may need to run npm install as superuser.
-
When I install libraries with npm install, my node_modules directory is nearly empty and this error is shown:
npm ERR! Error: shasum check failed
-
Check your node is updated to the most recent version. Optionally, reset your npm
npm set registry http://registry.npmjs.org/
npm cache clean
-
- 1. If more that 2 players play at the same time XTribe automatically couple them. Each couple of players plays a unique instance of the game. All this mechanism is implemented by ETS in a way that is completely transparent for the client, while the manager simply need to propagate the instanceId.